How I Draft My Bodice Patterns
March 07, 2021 •
•
afternoon projects
•
DIY
•
tutorial
This is my first in a series of how I draft patterns using my somewhat unconventional approach! For some reason I always found proper patterns really hard to work with, and conventional pattern drafting also basically ended up as a failure every time I tried it

How I draft patterns is mostly self taught and kind of weird, but I hope someone will find it helpful!
When drafting bodices I start with three measurements: the full bust measurement (mint), the back measurement (blue), and the bodice length (purple). To measure the full bust, take the tape measure around the widest part of your bust, keeping the tape measure level with the ground as much as possible. Then for the back measurement, measure around your back at around the same height, basically from armpit to armpit. If you have boobs this should be slightly less than half the full bust measurement. For the length, measure from the top of your shoulder over the widest part of your chest and then down however long you want the bodice to be.
Next I cut two rectangles: the front piece width should be your full bust minus your back measurement, with the length just being the length of the bodice measured. The back piece is the back width with the same length. When sewn together, this should form a tube with a circumference equal to your full bust measurement. Basically, it should be a straight tube that easily accommodates the widest part of your torso.
Since I was trying the bodice on often, I then cut the front piece in half and added a 1" strip to each half so that some fabric could overlap to pin closed without reducing the width of the front piece when closed. I marked some fake button holes with sharpie so that I could close the two front pieces evenly using pins.
The next step is to sew together the front and back pieces. Sew along the top leaving space for a neckline. Then sew along the sides leaving space for the arm holes. I honestly just guessed how wide these should be for now, since we'll be fitting the neck and arm holes later in the process.
FITTING #1!
Go ahead and try it on! Carefully pin the front together using your button hole marks as a guide. Then with pins or sharpies, mark the depth and width for your neckline and arm holes. It's fine if these are a little rough as we'll have a chance to refine these in a later step. Take the bodice off and mark out the full armscye (arm holes) and neckline shapes. If you have a french curve then honestly why are you even reading this janky-ass tutorial? Go make a real pattern with those fancy pattern making tools of yours! If you don't (like me) just eyeball it so it looks generally like what you see in bodice patterns.
FITTING #2
It's time to add darts! Since we initially measured our front and back based on the widest part of our torso, there is likely excess fabric towards the bottom of your bodice. Put the bodice back on and pinch the front of the bodice at the bottom until the excess lies comfortably flat without being too tight. Pin in place. Then follow the folded fabric up to your bust and put a dot generally where you want the dart to end, somewhere close to the widest part of your bust. Remove the bodice and mark triangular darts starting from the bottom fold and ending where marked. Sew down the darts as marked and double check that the bust fits properly if you like. Once you're generally happy with the fit, we'll then move the dart to a bust dart.
Moving the dart is actually incredibly easy and it totally blew my mind when I first learned about this technique. First, cut out the excess fabric of the dart. Then, cut along where you would like the dart to be moved to, making sure it ends on the same point as the original dart. Finally, shift the inner part of the fabric over so that the original dart is closed and a new dart is opened. Simply transfer this to a new pattern piece, and your dart has been successfully moved!
When transferring the pattern with the new dart placement, it's also a good chance to fix any errors you might have noticed in your armscye or head hole sizing. I noticed that both were a bit too large in my case, so I made sure to cut out less for those in my second draft.
FITTING #3
Sew your new pattern pieces together as the first time, making sure to close the new bust dart as well. Try it on and be amazed by the magical bust dart! I was also much happier with my neckline and armscye this time, but there was noticeable puckering and gaping around my armscye still. After looking into it, it seemed like there was a little too much fabric under my armpit, so I marked with a sharpie where it seemed like the excess fabric was (this was mostly just intuition informed by where the fabric was puckering and where I normally notice my sleeve seams tend to fall on my day to day tshirts or blouses.... sorry I don't have better advice but basically "listen to what the fabric is telling you"! ^^) and then cut out excess fabric from the armscye. After that, to address the gaping on the top of the sleeve I pinned a slight downward angle on the top seam. After this fitting it still admittedly wasn't 100% perfect, but I was happy enough with it to call it a pattern!
Before adjusting the armscye
after adjusting the armscye
That's all for this bodice pattern! Once you have a mockup you're happy with you can rip out the seams and use the muslin as a pattern for your desired garments! In theory I like to keep these muslins around so that in the future I don't have to do this entire process over again the next time I need to make myself a bodice for something, but in reality I always end up losing these and having to repeat the process again ^^
Tips:
- If you're cutting out a lower neckline, I would recommend making a standard neckline first for the fitting process, then cutting out the desired neckline once the rest of the pattern has been fitted and drafted.
- Instead of moving the dart to the side for a bust dart, if you prefer princess seams leave the darts at the bottom of the bodice and then use a sharpie to extend the dart line up. Then when you're cutting out your pattern pieces, you can cut open the dart and then separate the parts of the pattern by cutting along the line marked.
- If you prefer a back or side closure rather than middle, I would still recommend drafting the pattern with pins in the front as it will be much easier for you to get in and out of it while fitting. After the pattern is done you can keep the two front pieces pinned together to create a solid closed front pattern piece, and cut open the pattern somewhere else to move where the closure is installed. Just don't forget to add seam allowance where you cut!
I wonder if anyone else makes patterns like this? Tell me in the comments about your weird or unusual pattern drafting habits!
Tutorial! Afternoon Projects: Black x Pink Lace Up Phone Case
June 09, 2017 •
•
afternoon projects
•
DIY
•
larme
•
tutorial
Happy Friday everyone! I'm back today with a really cute and easy tutorial! I also made a video this time, so please give it your support!
I bought a really cheap silicone Head Case phone case from eBay a while ago. It was really cute and it served me well, but after 2 years of use, the paint had started to chip away, leaving the clear silicone case underneath exposed. This really bugged me, and it was getting less and less cute. I wish I'd remembered to take a before picture; before I decorated it the entire face had chipped away!

Here's the stock photo, so just picture it just like this but with half the face missing.

Tutorial! Afternoon Projects: Ank Rouge Inspired Top
March 18, 2017 •
•
afternoon projects
•
DIY
•
fashion
•
himekaji
•
larme
•
tutorial
Hello everyone! It's been a while since I posted anything. That first winter haul turned out to be the only winter haul after all. Such is life, I suppose!
Spring is on the way now, and as I'm thinking about my wardrobe I've started adding pieces to my collection already! One of my favorite styles that I've seen carry over from winter is the mock neck top. I think it's so cute and classy but also comfy and casual at the same time.
Afternoon Projects: Organizing My Sewing Bin
December 22, 2015 •
•
afternoon projects
•
DIY
•
Love Live
 |
| So messy! |
Once again, LLSIF releases
the perfect card for an event with only one week to work with. While I was planning how I would make each piece, I realized that I've totally lost my basic bodice pattern. I'm sure I kept it, and I'm sure I put it in my sewing box but... where in my sewing box is another question. For two years now it's been a huge mess. After each project, I'm usually very lazy and just stuff the fabric in wherever it fits. So, by now it's so tightly packed with untidied messes that finding anything is a huge pain. I find that sometimes I even put off projects simply because finding the patterns and fabric and thread is such a hassle! So, I decided to sit down and tackle this mess once and for all.
 |
| Sorted into piles. The piles from left to right: Scraps to keep, notions/tools, scraps to toss (two paper bags), and bolts of fabric. |
My first step was to take everything out of the bins and put it into piles- one for fabric, one for scraps, one for notions/sewing tools, and one for garbage. I was amazed to find how many tiny worthless scraps I had held onto over the years. What did I think any of these scraps would ever be useful for!?
I found the hardest part of this process to be deciding what to toss and what to keep, what to file as fabric and what to file as scraps. The criteria I ended up mostly sticking to was, if it's big enough to make a shirt out of, it's fabric. If it's smaller and I could make a cute bow out of it, then it's scraps, and if it's too small or ugly for even that much, then I toss it. It actually helped to streamline my process quite a bit!
 |
| Why in the world did I hold onto all of these useless scraps!? |
After everything was sorted, I began organizing my whole sheets of fabric. Since I live in a very small space, I have no choice but to keep all of my fabric in a bin under my bed, but I knew I wanted all of them to be visible without having to dig through. To achieve this, my goal was to stack the bolts vertically in my bin, but to avoid the fabric folding in on itself and becoming messy after a while, I needed some kind of backing to wrap my fabric around to keep it straight and tidy. Thankfully, my building happens to go through many cardboard boxes every day, so I have a steady supply of recycled cardboard boxes to use to this end! I measured the depth and width of my bin and cut out rectangles of cardboard using these dimensions.
 |
| Such hard work... |
After I finished cutting, I took had a nice glass of strawberry tea. Cutting cardboard is hard work!
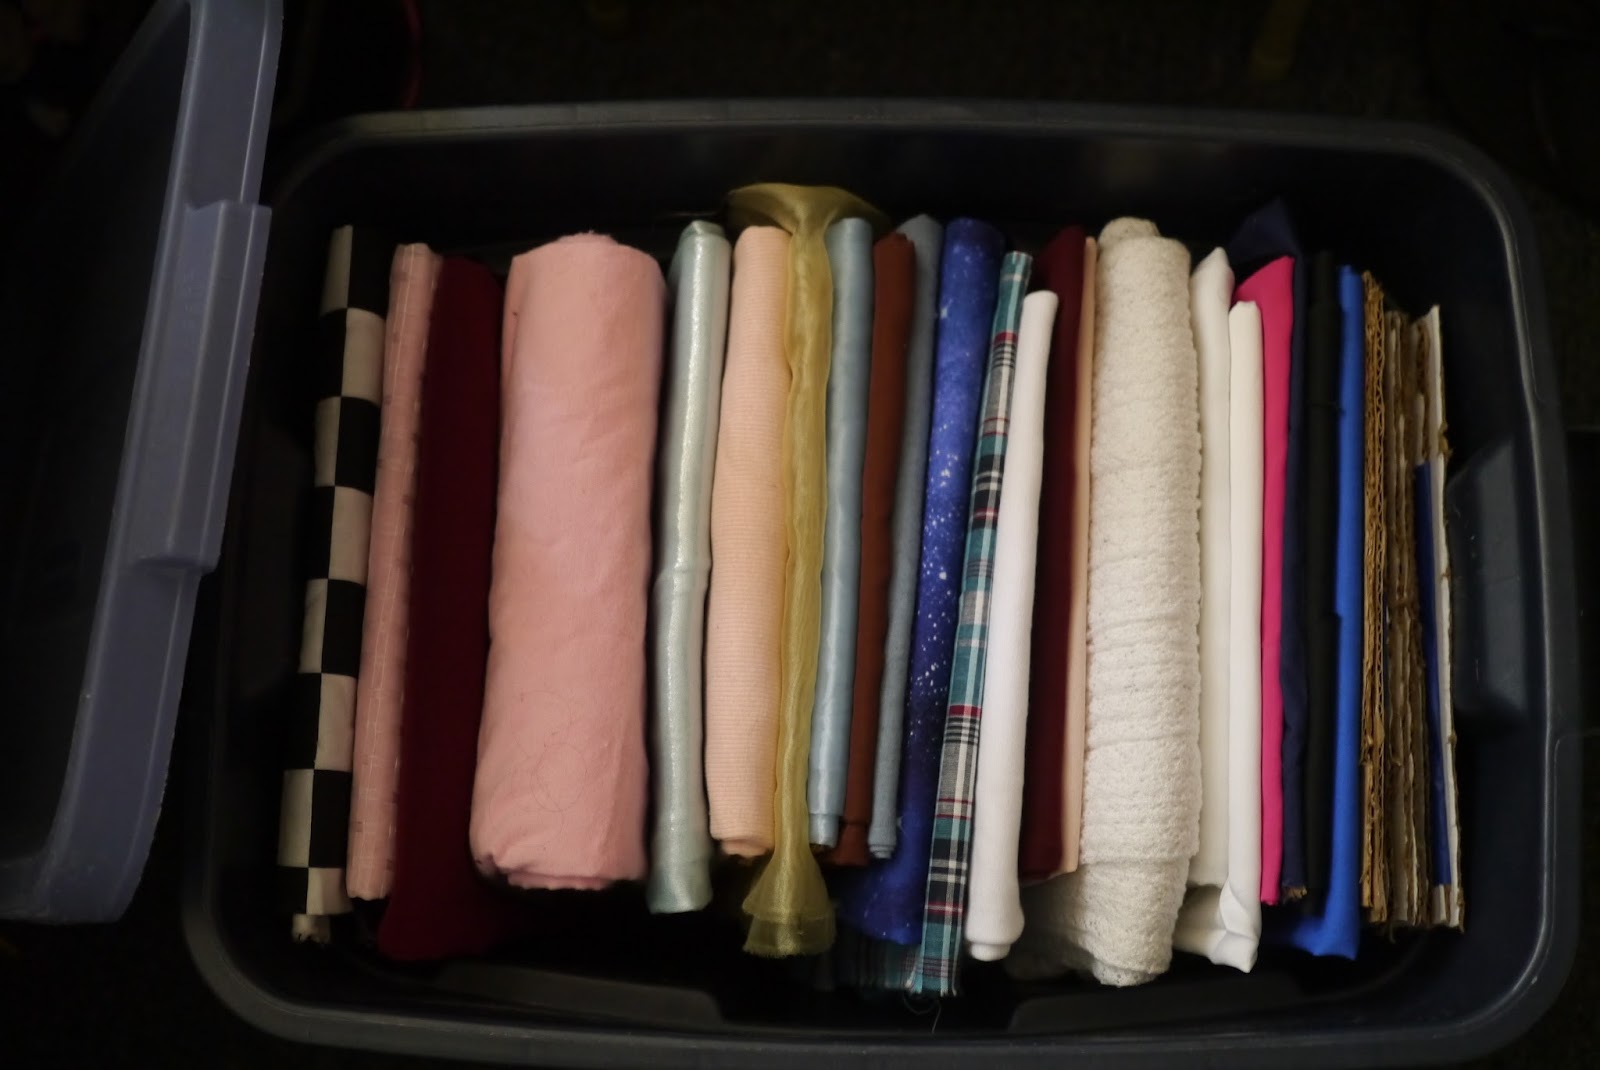
Getting back to work, I then neatly folded all of my fabric onto the freshly cut bolts and stacked them all in my bin. My technique was to fold the fabric up length-wise to be the same size as the short end of the bolt, then roll the whole thing up wrapping around the long end of the bolt.
It was a lot of work, but the end result looks so nice!
 |
| So pretty!! |
It turns out that just organizing my fabric took so long that it was already night-time by the time I finished, so at this point my scraps and notions are still a big jumble. Look forward to part two when I organize these as well! Meanwhile, even if those aren't organized yet, it's a much more manageable mess with the bolts of fabric tamed, and I was able to find my pattern piece!
As a bonus round, here's a picture of how the cosplay actually turned out. Many thanks for
MVM Photography for making the photoshoot possible.

Stay tuned for part two next week!

Afternoon Projects: Faux Sukapan
September 24, 2015 •
•
afternoon projects
•
DIY
It's been way too long since my last update! School is starting very soon so there have been a lot more people to hang out with from Summer. The cafeteria is getting so crowded! Gone are the days that I could eat when I'm hungry without standing in a huge line. Ah well... but it's kind of exciting isn't it?
Yesterday I finally sat down with some of my cute fabric and decided to make a skirt! I want to make real sukapan in the future, but I think I need to find the right fabric for it. If it's too stiff I'm afraid it'll look too much like shorts. But in the mean time, I figured I could make some fake sukapan with my lace shorts and a gathered circle skirt!
 |
| My lace shorts. Wouldn't it look cute peeking out from a skirt? |
I found this fabric at Joann and while it's not absolutely perfect for himekaji (the print is a bit small compared to most Liz Lisa skirts) I still think it has a cute effect. This kind of skirt is very cute and also very easy to do. If you've ever made a circle skirt, it's exactly like that, only instead of using your actual waist measurement, you make the opening wider so that you can gather it as well. After a bit of experimenting, I found that a gather of 1.5x your waist measurement is ideal. I think this look is much cuter than a regular gathered skirt, since you can get really full without having a whole lot of bulk right at your waist. Since I wanted this to look like sukapan, I made sure to hem the skirt just short enough so that the bottom tier of my shorts would peek out from underneath. I really like the result!
As you can see, this skirt really is just a huge circle skirt that's been gathered to my waist measurement!
I gathered most of the skirt and sewed it to a waistband. When you do this, you shouldn't be lazy like I was and you should use interfacing. I was originally meaning to have the entire waistband be elastic but found that it was adding a bit too much bulk to my waist and it was unflattering. When I changed my mind the waistband had already been sewn shut so I didn't bother with it... but it would look much better if you used some!
I did leave a small section in the back ungathered so that I could add some elastic. I love elastic skirts and shirring because it always fits you perfectly, it's easy to get on and off, and it's really comfortable.
I'm sure this is something that I'll make again, so I'll be sure to document the process a bit more carefully next time and turn it into a full blown tutorial.
All of the things I ordered in the last two hauls have arrived, so I'm way overdue for a big review post, so you'll be seeing that soon!
Thanks for reading~
Tutorial! Afternoon Project: Bunny Sneakers
August 22, 2015 •
•
afternoon projects
•
DIY
•
fashion
•
shoes
•
tutorial
I've been seeing cute bunny ear shoes all around and thought they were a really great piece to have. I'm trying to find more comfy and casual shoes which are cute enough to fit loosely into a himekaji style. These might not scream princess, but they're definitely extremely cute and unique, and for a whimsical summer wardrobe I think it ties in.
Afternoon Projects: Eyelet Off the Shoulder Blouse
July 22, 2015 •
•
afternoon projects
•
DIY
•
fashion
•
himekaji
A little while ago I went to the thrift store and found a shirt with this cute eyelet and pintuck design to it. I was inspired by an off the shoulder Liz Lisa top I had seen and wanted to make it cute and summerey! This was a pretty quick afternoon project, and I'm happy with the results! Lose fitting tops don't normally flatter me, but I think the stiffness of the cotton is just great enough to hang nicely.
It's a bit different from what I'm used to wearing, so I was a little self conscious wearing it yesterday, but I got a lot of compliments! I think it looks cute and doll-like without being too over the top.
 |
| Before |
|
 |
| After! |
|
I also got the first few items in my ebay haul in the mail recently, so I've got a review on the way, as well as some cosplay updates and hopefully more afternoon projects to post of.
Until next time!


 How I draft patterns is mostly self taught and kind of weird, but I hope someone will find it helpful!


